Are you still relying on WooCommerce’s standard order confirmation emails to communicate with your buyers? Did you know that the moment immediately following a checkout is when your customers are most excited, engaged, and receptive to your brand?
Default WooCommerce receipts do only one basic job: they confirm financial transactions. They display an itemized invoice, tax breakdown, and shipping address—and then go silent. By failing to follow up with product care instructions, shipping timelines, review requests, and personalized repeat incentives, store owners forfeit thousands of dollars in repeat customer revenue.
In the past, solving this required subscribing to expensive third-party SaaS platforms like Klaviyo, Mailchimp, or ActiveCampaign. These services charge escalating monthly fees that surge as your customer list expands. With SiteSkyline Email Campaign Manager, you can design, automate, and dispatch sophisticated multi-step post-purchase email sequences directly inside your WordPress dashboard with zero monthly subscriber taxes.
In this comprehensive, step-by-step tutorial, you will learn how to build an automated WooCommerce post-purchase nurture engine from scratch—complete with intelligent delays, personalized merge tags, review prompts, and unique single-use discount coupons.
Why Post-Purchase Email Sequences Drive Massive E-Commerce Growth
Acquiring a new e-commerce customer costs between five to seven times more than retaining an existing buyer. Furthermore, repeat customers spend an average of 67% more per transaction than first-time shoppers. A well-crafted post-purchase email sequence bridges the critical gap between order placement and delivery:
- Combats Buyer’s Remorse: Immediately reassuring customers that their order was received and explaining fulfillment timelines builds confidence and cuts down support tickets.
- Boosts Product Satisfaction: Sharing usage tips, size guides, and care advice ensures customers enjoy their purchase, dramatically lowering return and refund rates.
- Generates Social Proof: Timing an automated review request 3 to 7 days after delivery captures authentic 5-star product ratings while the experience is fresh.
- Accelerates Second Purchases: Delivering an automated, single-use discount coupon encourages buyers to return to your catalog before their interest cools.
| Capability | Default WooCommerce | Third-Party SaaS (Klaviyo/Mailchimp) | SiteSkyline Email Campaign Manager |
|---|---|---|---|
| Order Confirmation | Basic transactional receipt | Customizable HTML receipt | Full branded Gutenberg/Visual template |
| Multi-Step Follow-ups | ❌ Not supported (Single email only) | ✅ Supported (Requires monthly subscription) | ✅ Native multi-step visual sequence builder |
| Dynamic Single-Use Coupons | ❌ Manual creation only | ⚠️ Requires third-party webhook sync | ✅ Built-in automated coupon generator |
| Subscriber Pricing | Free (Core feature) | ❌ Expensive monthly tier based on contacts | ✅ 100% self-hosted, unlimited contacts |
| Data Privacy & GDPR | Data remains in local database | ❌ Customer order data synced to US cloud servers | ✅ Native local storage, zero external data leakage |
| Conditional Branching | ❌ None | ✅ Supported | ✅ Built-in (Opened, unopened, clicked) |
Step 1: Navigating the Email Campaign Manager Dashboard
To begin, log in to your WordPress admin dashboard and click on Email Manager in the left sidebar navigation. This opens the central command center for your entire store’s email automation infrastructure.

The dashboard provides immediate visibility into key delivery health metrics:
- 14-Day Delivery Graph: Track total emails queued, sent, and opened across your automated sequences.
- Campaign Status Overview: Monitor active, paused, draft, and completed campaigns at a glance.
- Pre-Built Library: Access pre-configured e-commerce campaigns, including flash sale announcements, VIP rewards, and customer review requests.
Step 2: Creating a Campaign & Selecting the WooCommerce Trigger
From the dashboard or Campaigns tab, click the Create New Campaign button. This opens the intuitive 3-step visual campaign configuration wizard.

Configure the following initial parameters:
- Campaign Title: Enter an identifiable name, such as
WooCommerce Post-Purchase Thank You & Care Drip. - Select Source Integration: پر کلک کریں۔ WooCommerce integration card. SiteSkyline automatically detects active WooCommerce installations and displays relevant e-commerce hooks.
- Select Event Trigger: منتخب کریں۔ Order Completed (
order_completed). This guarantees that our sequence fires automatically the exact moment an administrator marks an order as fulfilled or when digital orders autocomplete.
Step 3: Setting Granular Audience Filters & Order Conditions
پر کلک کریں۔ Step 2: Audience Filters & Rules in the top progress bar. While many stores want to send thank-you emails to all buyers, SiteSkyline allows you to define targeted rules so high-value VIPs or buyers of specific product lines receive customized content.

Under the WooCommerce Conditions panel, you can configure:
- Match Condition Rule: Set to All conditions (AND) if an order must satisfy every rule, or Any condition (OR) for flexible eligibility.
- Specific Products & Categories: Restrict follow-ups to buyers who purchased specific catalog items (e.g., apparel care guides sent only to clothing purchasers).
- Order Value Thresholds: Set minimum order values (e.g., total > $100) to trigger premium VIP thank-you gifts.
- Broad Coverage Baseline: Leave rules empty to send this universal onboarding sequence to 100% of completed store orders.
Step 4: Writing the Initial Thank You & Fulfillment Care Email
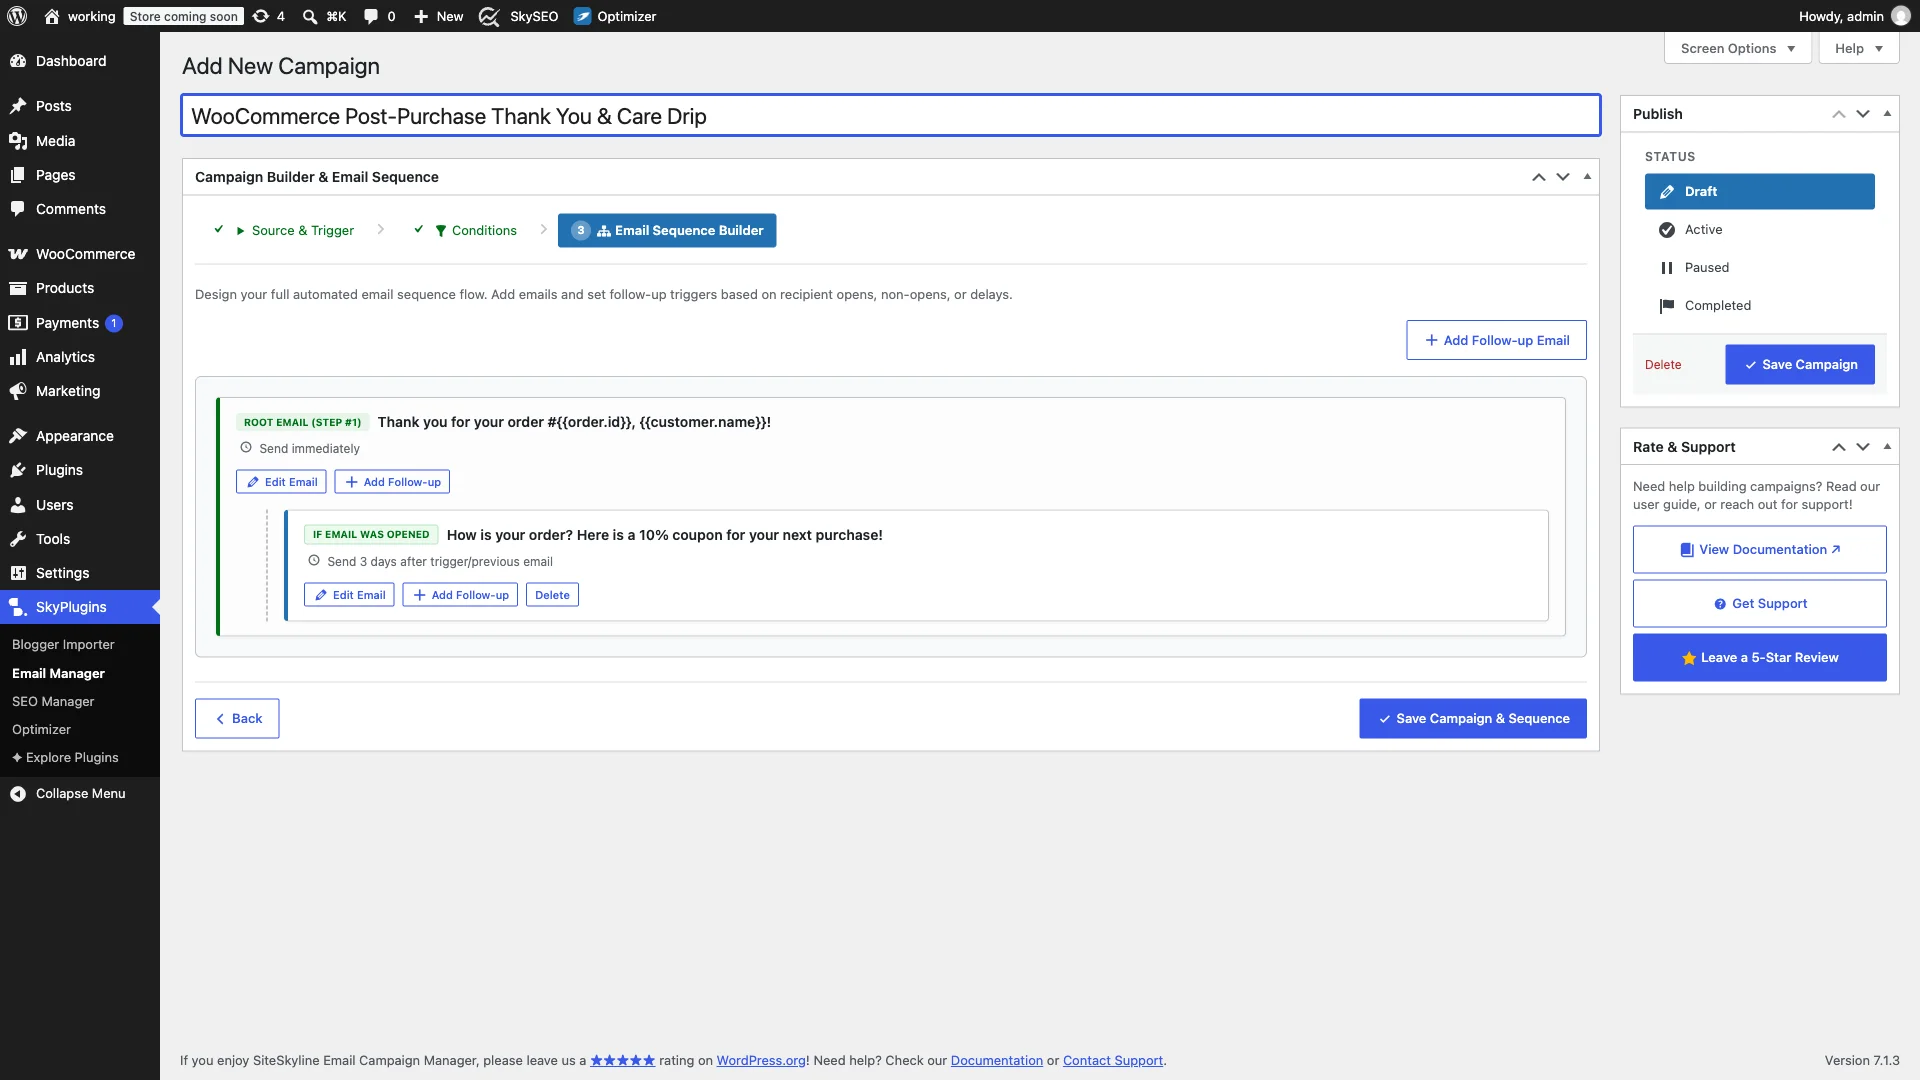
Advance to Step 3: Email Sequence Builder. Here, SiteSkyline displays your visual automation tree. Click the Edit Email button on the Root Email (Step #1) node to open the email configuration modal.

Set up the initial email parameters:
- Delivery Timing: منتخب کریں۔ Send immediately so the buyer receives reassurance within seconds of order completion.
- Subject Line: Use dynamic merge tags for instant personalization:
Thank you for your order #{{order.id}}, {{customer.name}}! - Rich Content Body: Craft a warm, reassuring message that highlights order details, sets realistic shipping expectations, and provides clear contact options:
<p>Hi {{customer.name}},</p>
<p>Thank you so much for your purchase! We are thrilled to confirm that your order <strong>#{{order.id}}</strong> for <strong>{{order.total}}</strong> has been received and is being prepared with care.</p>
<p>Here is what happens next:</p>
<ul>
  <li>Our fulfillment team verifies and packages your items securely.</li>
  <li>You will receive a notification with shipping tracking as soon as it departs.</li>
  <li>Need help or have questions? Simply reply to this email anytime.</li>
</ul>
<p>Warm regards,<br>The {{site.name}} Team</p>
کلک کریں۔ Save Step at the bottom of the modal to persist your root email configuration.
Step 5: Adding a Follow-Up Drip with a Dynamic Single-Use Coupon
A single email is not a sequence. To turn a one-time buyer into a repeat customer, click the Add Follow-up button on your root node. This attaches a secondary branch to your visual sequence tree.

Configure the follow-up step with these high-converting settings:
- Condition: Set to Opened so this follow-up reaches recipients who engaged with your initial confirmation.
- Delay: Set delivery timing to 3 days (or 7 days for physical delivery). This gives the customer ample time to receive and unbox their order.
- Subject Line:
How is your order? Here is a 10% coupon for your next purchase! - Dynamic Coupon Generator: چیک کریں۔ Enable Dynamic Coupon box. Configure a 10% Discount with a 14-Day Expiration. SiteSkyline automatically creates a unique WooCommerce coupon code per recipient upon send, completely eliminating code leaks on coupon aggregator sites.
- Insert Merge Tag: Include the
{{coupon.code}}tag in your email callout box so the recipient receives their personal savings voucher.
کلک کریں۔ Save Step to commit the follow-up email to your visual automation tree.
Step 6: Reviewing the Flowchart, Sending a Test Email & Activating
With both steps configured, review your complete automation flowchart on the Sequence Builder canvas. The visual node tree shows parent-child relationships, delay timing, and conditional branching at a glance.
To finalize and launch your automated post-purchase sequence:
- Send a Test Email: Click into any step and click Preview / Send Test to deliver a live test copy to your personal inbox, ensuring formatting and styling render flawlessly across desktop and mobile email clients.
- Update Campaign Status: In the right-hand شائع کریں۔ metabox, select the فعال status radio button.
- Save Campaign: نیلے رنگ پر کلک کریں۔ Save Campaign بٹن
Your automated post-purchase sequence is now live! The next time a customer completes an order on your WooCommerce store, SiteSkyline Email Campaign Manager will instantly queue and dispatch your personalized onboarding series.
Recommended Post-Purchase Drip Schedules
Depending on whether you sell digital downloads, physical goods, or services, the timing of your follow-up sequence should be tailored to customer consumption habits:
| Store Type | Email #1 (Immediate) | Email #2 (Day 2 to 4) | Email #3 (Day 7 to 10) |
|---|---|---|---|
| Physical E-Commerce | Order Confirmation & Tracking Expectations | Care Instructions & “How to Enjoy” Tips | Review Request & 10% Next-Order Coupon |
| Digital Goods / Software | Instant License Key & Installation Guide | Advanced Tips & Video Walkthrough | Customer Support Check-in & Community Invite |
| Services / Consultations | Intake Form & Preparation Checklist | What to Expect on Your Session | Follow-up Summary & Retainer Offer |
Deliverability & WP-Cron Queue Best Practices
Unlike basic WordPress mail plugins that attempt to send bulk emails synchronously during page loads—slowing down checkouts and timing out—SiteSkyline Email Campaign Manager handles delivery via an asynchronous background queue:
- Asynchronous Non-Blocking Sending: Orders complete instantly for shoppers. Emails are scheduled in the background via WordPress Cron (
wp_cron). - SMTP Integration: For optimal inbox placement and 99%+ deliverability, pair SiteSkyline with an SMTP provider such as Postmark, Amazon SES, SendGrid, or Brevo.
- Zero Bloat Privacy Tracking: Open tracking and click statistics are processed natively on your own server without invasive third-party tracking scripts, ensuring total compliance with global privacy regulations.
اکثر پوچھے گئے سوالات (FAQ)
Will this replace the default WooCommerce receipt email?
SiteSkyline runs alongside WooCommerce without interfering with standard transactional notifications. You can choose to keep WooCommerce’s default order receipt active, or streamline communications by customizing your complete onboarding series inside SiteSkyline.
How does the dynamic coupon generator prevent code abuse?
SiteSkyline generates an individual, randomized alphanumeric coupon directly inside the WooCommerce coupon database for each recipient. The coupon is automatically restricted to the buyer’s billing email and configured for a single usage with an automatic expiration date. Even if shared on Reddit or coupon browser extensions, other shoppers cannot redeem it.
Does SiteSkyline charge per subscriber or per email sent?
No. SiteSkyline Email Campaign Manager is 100% self-hosted on your WordPress server. Whether you have 100 customers or 100,000 customers, you never pay monthly contact tiers or subscriber penalties.
What happens if a customer cancels or refunds their order?
SiteSkyline monitors order status changes. If an order transitions to Cancelled or Refunded before subsequent delayed sequence steps execute, pending follow-up emails in the delivery queue are automatically pruned, preventing awkward promotional follow-ups from reaching dissatisfied buyers.
Can I send different follow-up emails based on what product was purchased?
Yes. In Step 2 (Audience Filters), you can select specific products or product categories. This enables you to create dedicated care guides for specific catalog lines (e.g., leather goods care tips vs. electronics setup tutorials).