
Have you ever changed a post’s URL, updated your permalink structure, or deleted an outdated piece of content, only to have visitors and search engines land on an ugly 404 Not Found error? Whenever you alter a web address without setting up a proper redirect, you lose your hard-earned organic rankings, break incoming backlinks, and frustrate potential customers.
To preserve your SEO value, you need to set up a 301 Permanent Redirect. A 301 redirect tells search engine crawlers like Googlebot that a page has permanently moved to a new destination, transferring up to 99% of the original URL’s link equity (PageRank) to the replacement page.
However, poorly configured redirects often lead to redirect chains and infinite loops (such as Page A redirecting to B, which redirects to C). These multi-hop chains deplete your Google crawl budget and drastically slow down page speed.
In this step-by-step tutorial, we will show you how to set up 301 redirects, write regex matching rules, test URL paths, and detect and eliminate redirect chains in WordPress using स्काई एसईओ प्रबंधक.
Understanding HTTP Redirect Status Codes (301 vs 302 vs 307 vs 410)
Choosing the correct HTTP status code is vital for search engine indexing. Here is a quick breakdown of the most common redirect types:
| Status Code | नाम | SEO Impact & PageRank Transfer | Best Used For |
|---|---|---|---|
| 301 | स्थायी रीडायरेक्ट | Transfers full PageRank (90-99%) to new target URL | Permanently moving posts, changing permalinks, migrating domains |
| 302 | Temporary Found | Does NOT transfer PageRank; keeps original URL indexed | Temporary landing pages, A/B testing, seasonal promotions |
| 307 | Temporary (Method-Preserving) | Does NOT transfer PageRank; preserves HTTP POST data | Temporary server maintenance and ecommerce checkout flows |
| 410 | Gone Permanently | Tells Google the content is permanently deleted and never returning | Purging spam pages or dead URLs you never want re-indexed |
Step 1: Access the WordPress Redirection Dashboard
To start managing your redirects, log in to your WordPress admin dashboard and navigate to SkySEO » SEO Manager. Next, click on the पुनर्निर्देशन tab in the navigation menu.
The dashboard presents an immediate operational summary of your website’s routing health:
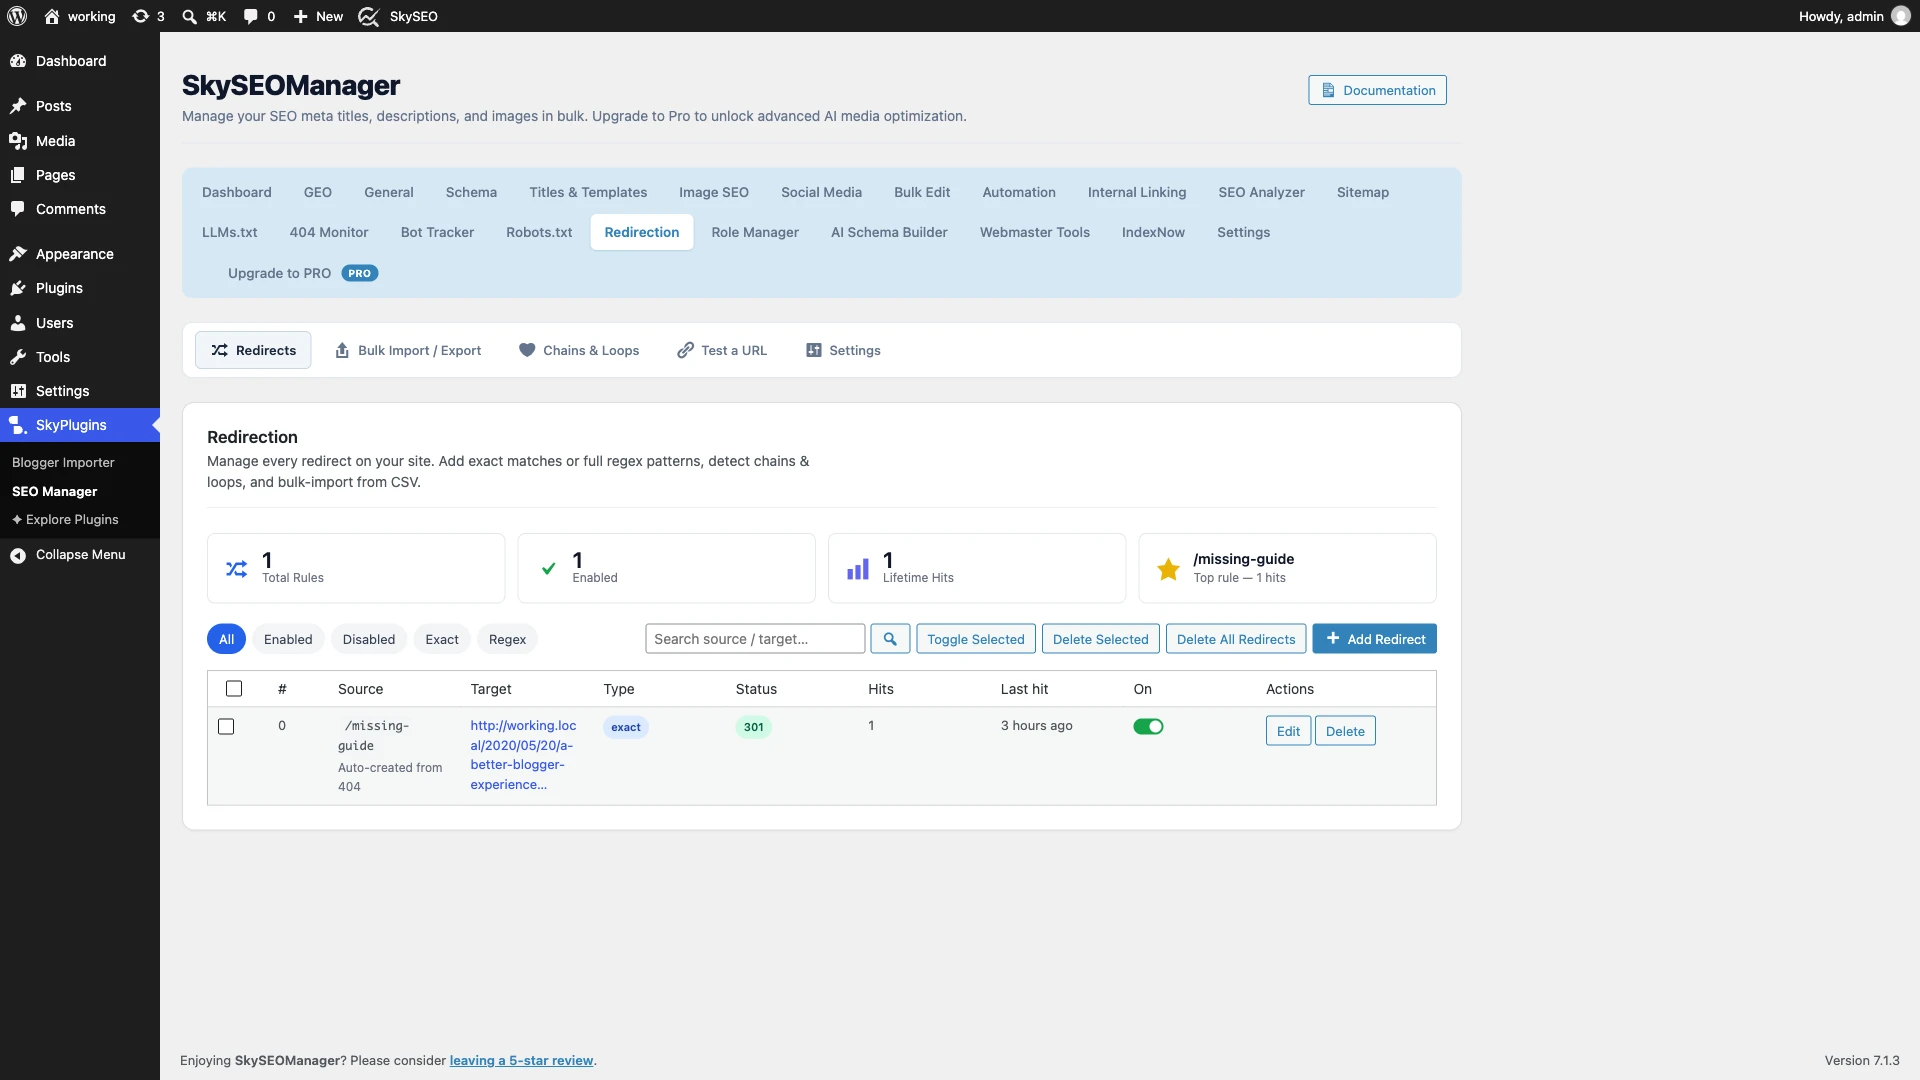
- Total Rules & Enabled Status: Displays the complete count of configured rules and how many are currently active.
- Lifetime Hits: Tracks how many total times visitors and crawlers have triggered your redirects.
- Top Rule: Highlights which redirect rule receives the most referral traffic.
- Filterable Rules Table: Easily toggle between सभी, सक्रिय, Disabled, Exact, और Regex rules.
Step 2: Add Exact and Regex 301 Redirect Rules
To create your first redirect, click the blue Add Redirect button above the table. A clean configuration modal will open.
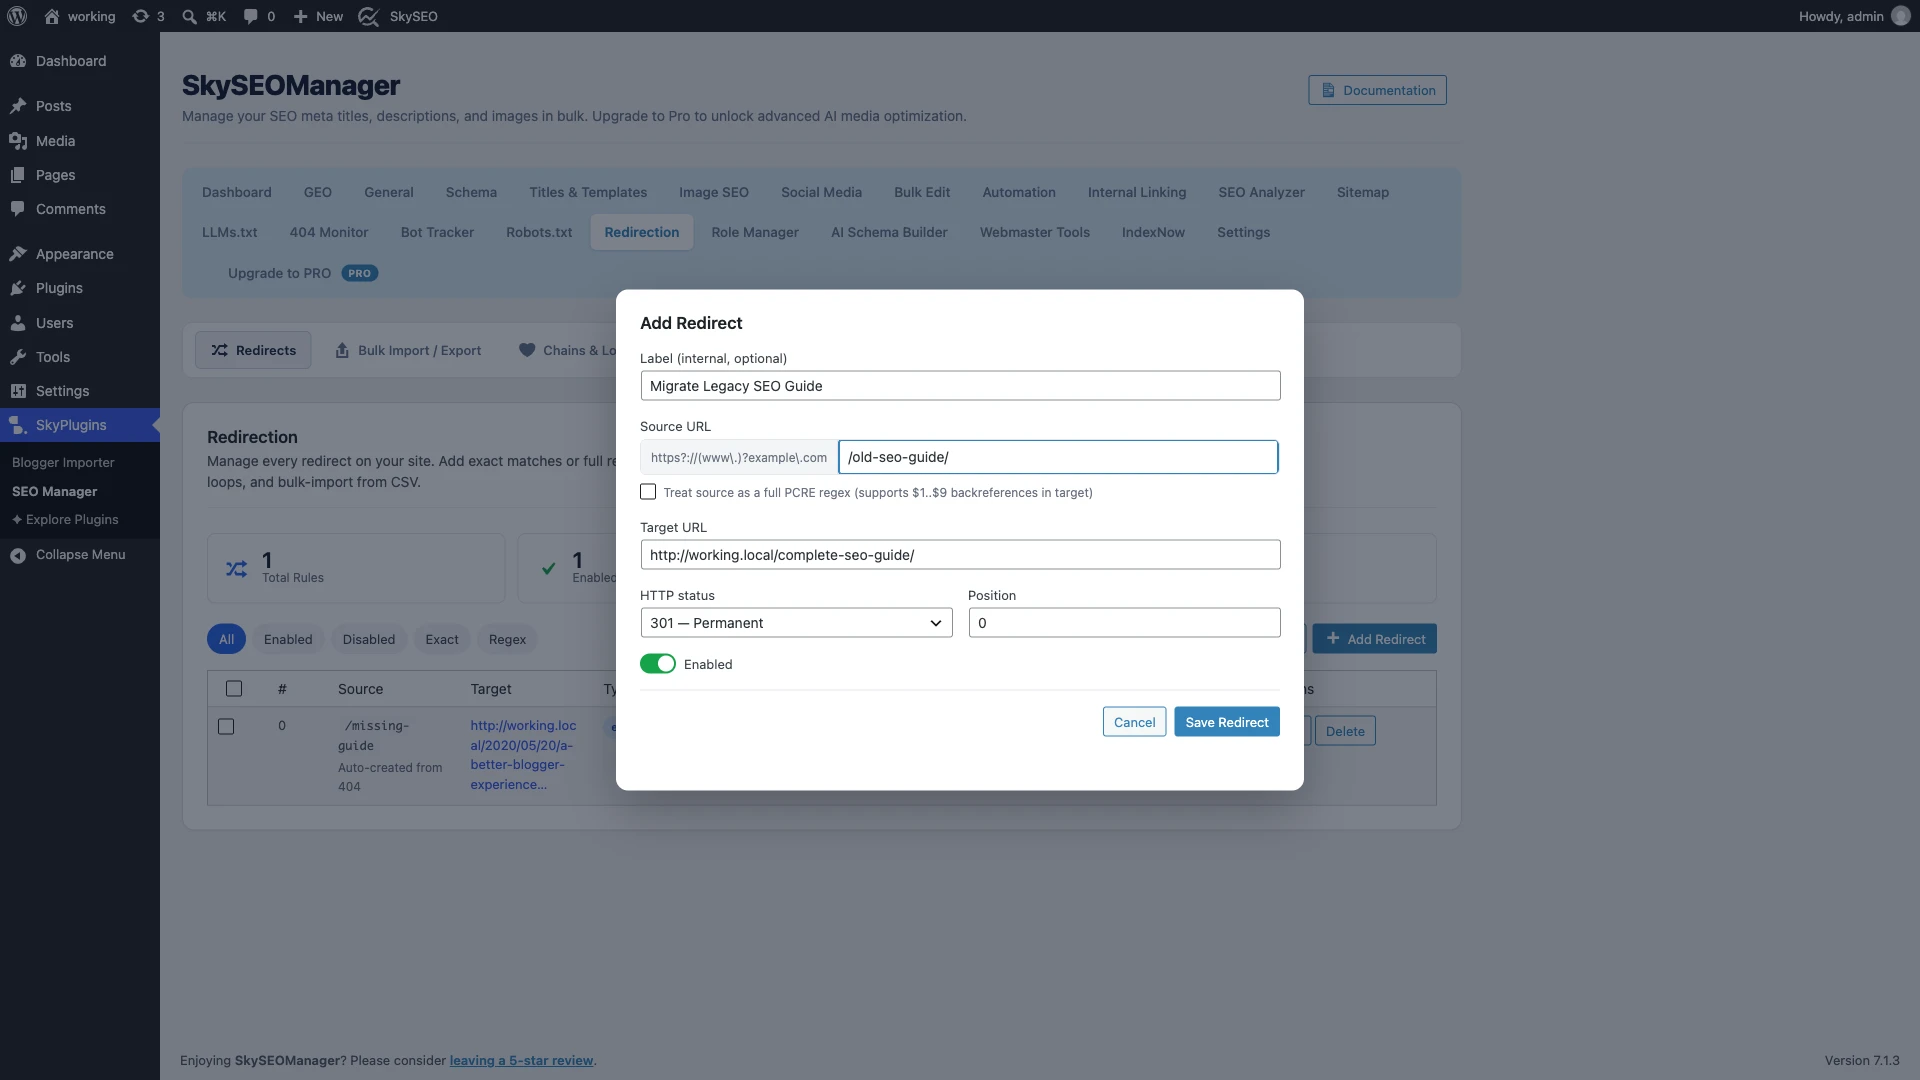
- Label (Optional): Enter a brief internal note explaining why this rule exists (e.g., Migrate Legacy SEO Guide).
- Source URL: Enter the relative path of the old or dead page (e.g.,
/old-seo-guide/). - Target URL: Enter the new destination URL where visitors should land (e.g.,
http://working.local/complete-seo-guide/). - HTTP status: चुनना 301 — Permanent for permanent content migrations.
- Regex Matching (Advanced): If you want to redirect an entire folder or URL pattern (for instance, redirecting
^/blog/(\d+)-(.+)$से/news/$2), check the regex box to enable full PCRE pattern matching with$1..$9backreferences.
क्लिक Save Redirect to instantly publish the rule to your database.
Step 3: Test Your Redirection with the URL Simulator
Before assuming your redirect works, you should verify that it triggers properly without causing unexpected side-effects. Sky SEO Manager features a built-in Test a URL उपकरण।
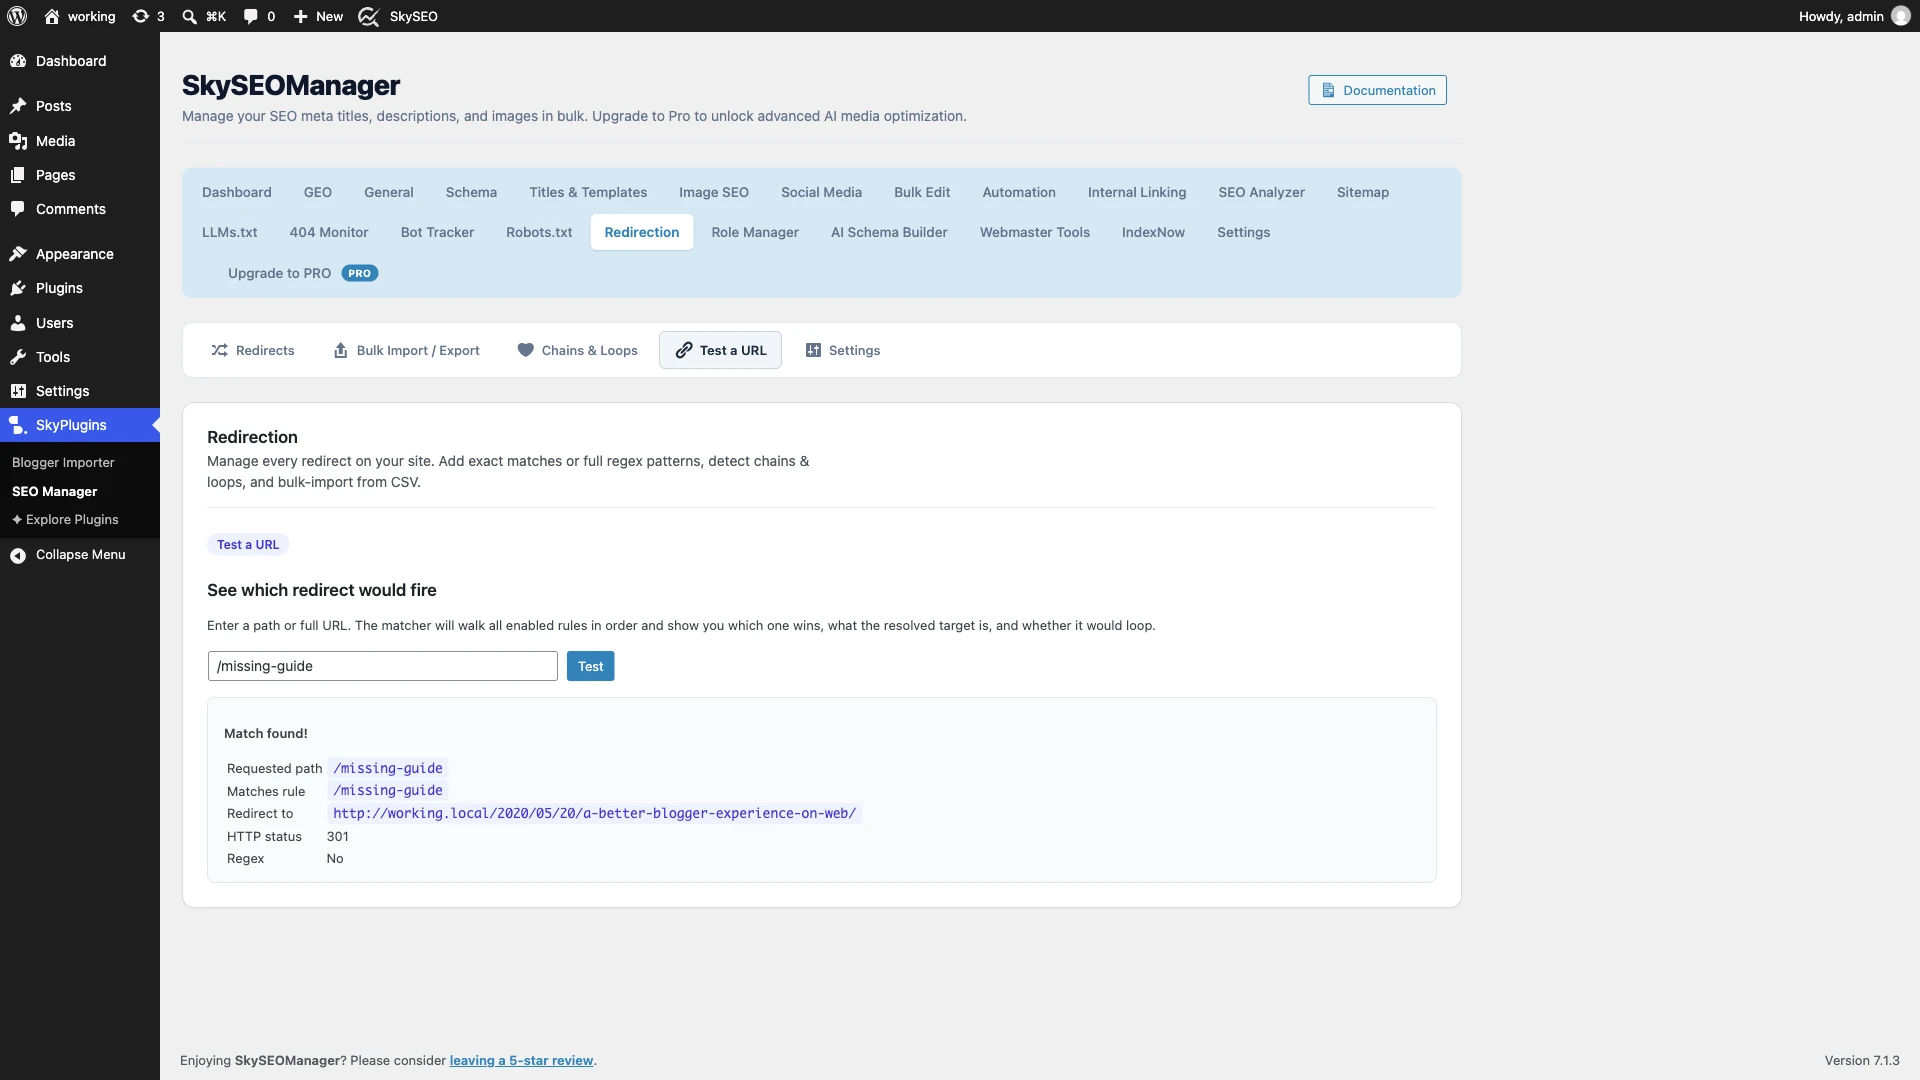
पर क्लिक करें Test a URL subtab. Enter your requested path (e.g., /missing-guide) and click टेस्ट.
The engine will evaluate your input against all active rules in priority order and display:
- Match Status: Confirms whether an active rule matched your test query.
- Matching Rule: Identifies which rule pattern captured the request.
- Redirect Destination: Verifies the exact resolved target URL.
- HTTP Code: Confirms whether a 301, 302, or 307 header is issued.
Step 4: Detect and Fix Redirect Chains & Infinite Loops
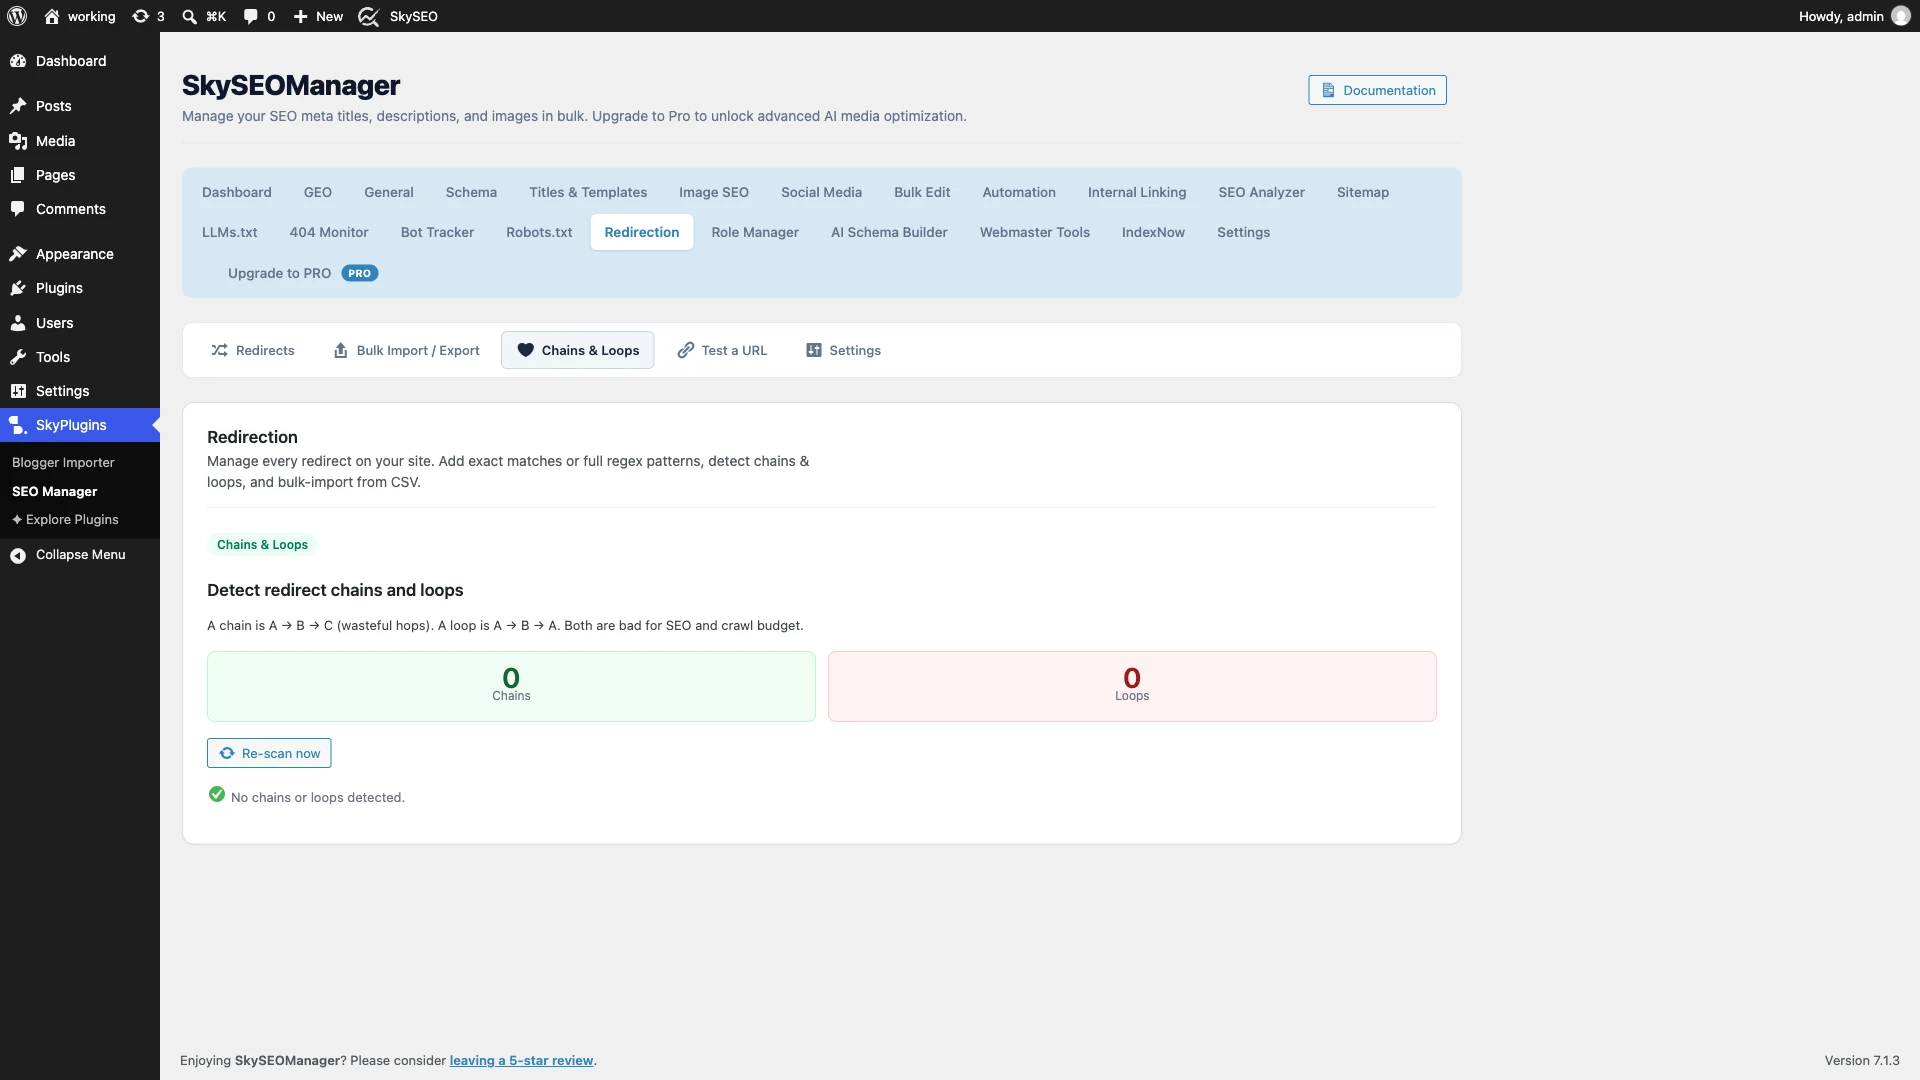
Over months or years of running a website, content URLs often change multiple times. If URL A redirects to URL B, and URL B later redirects to URL C, you have created a रीडायरेक्ट श्रृंखला.
Why are redirect chains bad for SEO?
- Slows Mobile Load Speeds: Every extra redirect hop requires a new DNS lookup and TCP handshake, adding 200–500ms of latency per hop.
- Wastes Google Crawl Budget: Search engine bots will stop following redirects after 4 to 5 hops, causing the destination page to drop out of the index.
- Creates Infinite Loops: If URL A redirects to B and B redirects back to A, browsers fail with an
ERR_TOO_MANY_REDIRECTSerror.
क्लिक करें Chains & Loops subtab and click Re-scan now. The diagnostic scanner traces all paths and automatically detects multi-hop chains, allowing you to update source URLs to point directly to their final destination.
Step 5: Bulk Import and Export Redirects via CSV
If you are redesigning an existing site or migrating from plugins like पुनर्निर्देशन, योस्ट एसईओ, या रैंक गणित, you do not need to copy and paste your rules one by one.
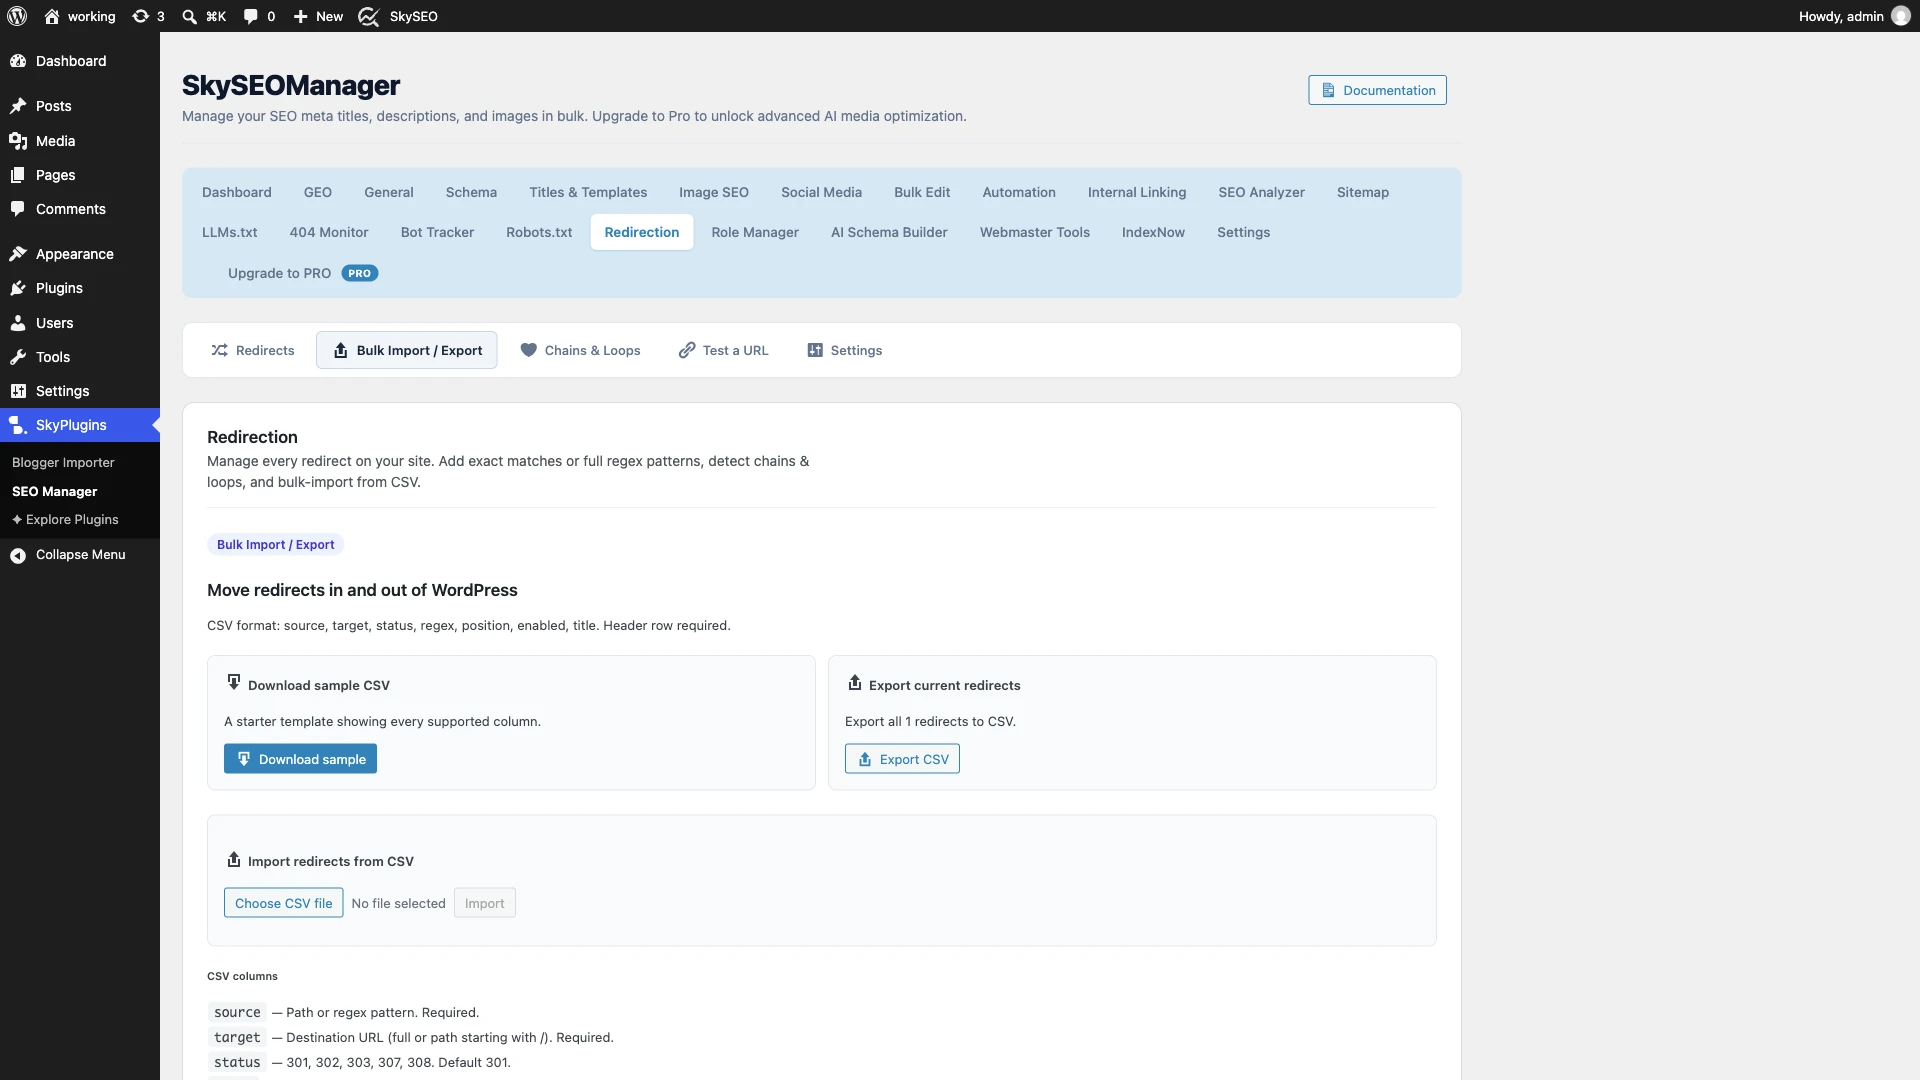
पर नेविगेट करें Bulk Import / Export subtab:
- Download Sample CSV: Download a starter template containing all required column headers:
source,target,status,regex,position,enabled, औरtitle. - Export Current Redirects: Create an instant CSV backup of all existing rules before conducting site-wide URL migrations.
- Import Redirects from CSV: Choose your CSV file and click Upload and Import to process hundreds of redirection rules in seconds.
Step 6: Configure Global Matching Settings & Trailing Slashes
To ensure your redirection system handles minor URL variations gracefully, open the सेटिंग्स subtab.
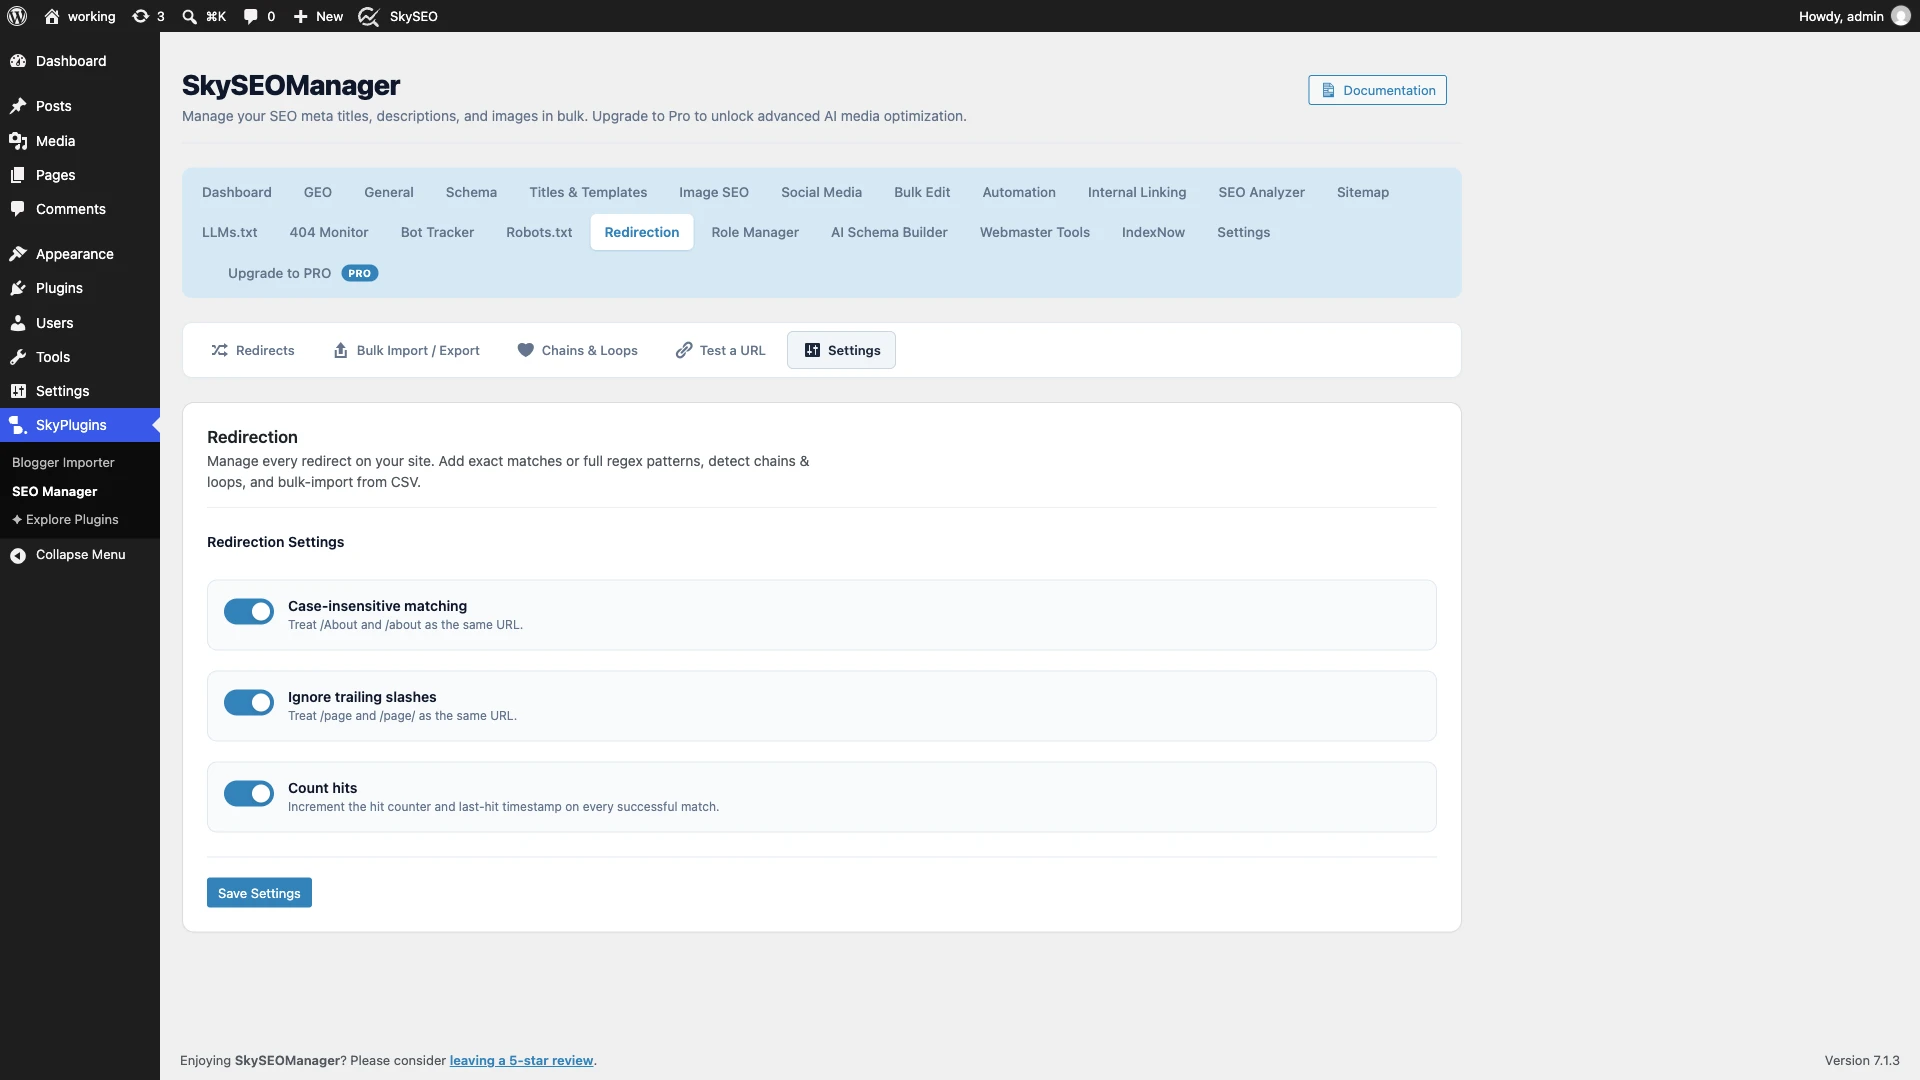
- Case-insensitive matching: Keeps your redirects resilient by treating
/About,/ABOUT, और/aboutas the exact same target URL. - Ignore trailing slashes: Prevents duplicate content issues by matching both
/pageऔर/page/identically. - Count hits: Increments hit counters and timestamps on every successful redirection, giving you clear visibility into which legacy links remain active.
नीले पर क्लिक करें सेटिंग्स सेव करें button to apply your global preferences.
Best Practices for WordPress Redirection Management
To maintain peak website performance and search rankings, keep these operational rules in mind:
- Always Use 301 for Permanent Relocations: Never use 302 temporary redirects for deleted pages or permalink updates, as 302s do not pass ranking equity.
- Keep Internal Links Updated: While redirects ensure visitors reach the right page, your internal links should point directly to the destination URL rather than relying on redirects.
- Audit Your 404 Logs Weekly: Monitor your 404 logs regularly to catch broken incoming backlinks from external sites and redirect them to relevant live content.
- Never Exceed 2 Redirect Hops: Aim for 1-to-1 direct redirections. Flatten any chains immediately using the Chains & Loops scanner.
Frequently Asked Questions (FAQs)
Do 301 redirects hurt my SEO?
No. When set up properly, 301 redirects preserve your search engine rankings and transfer up to 99% of link equity from the old URL to the new one.
301 और 302 रीडायरेक्ट में क्या अंतर है?
A 301 redirect indicates a permanent move and passes ranking authority to the new URL. A 302 redirect indicates a temporary move, meaning Google retains the old URL in search results and passes no link equity.
What is a redirect chain and why is it dangerous?
A redirect chain happens when a URL redirects to another URL, which in turn redirects again (A → B → C). This delays page loading, wastes crawl budget, and can cause Google to stop indexing your content.
Can I redirect multiple URLs using regex in WordPress?
Yes. Sky SEO Manager supports full PCRE regular expressions. You can capture variables using parentheses (e.g., ^/blog/(.*)$) and use backreferences (/news/$1) to redirect entire subdirectories with a single rule.
We hope this step-by-step tutorial helped you learn how to set up 301 redirects and fix redirect chains in WordPress. You might also want to check out our guide on How to Run a Complete Technical SEO Audit in WordPress or read our tutorial on How to Customize SEO Titles and Meta Description Templates.